How to Write a Course Description?

You have determined your course topic, completed the hardcore research, outlined the course content, and created the course materials, but there’s still one essential step left! Knowing how to pitch your course to prospective learners! The best way to do this is by writing a compelling course description. But how to write a course description that converts?
Writing a description of the course doesn’t just involve formulating a course title and enlisting the course topics. In fact, you need to master the skill of persuading your audience yet accurately state your course offerings. As a course creator you need to craft a clear and transparent course description that highlights your unique value proposition and attracts learners!
Imagine your course description as your sales pitch, helping you market your course and gain an edge over other course creators! If you are a course creator struggling to craft an apt course description, this blog is your ultimate guide! So, let’s add accuracy, persuasion, and engagement to craft an enthralling course description!
What are Course Descriptions?
A course description is the first thing that users associate with your course. It is also a pivotal element that decides whether a customer will purchase a course. Hence, you must understand the basics of a course description.
So, what is a course description?
It includes all the essential details of your course, such as its structure, learning objectives, and course content. Additionally, it includes teaching methods, the target audience, and instructor information.
The tone, language, and style of the course description depend on your course topic and target audience. For example, the tone of an introductory course in indoor gardening differs from that of a renowned university’s neuroscience course.
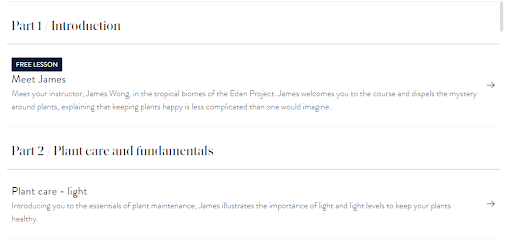
To understand it better, let’s compare the course descriptions of the following courses. While James Wong’s gardening course portrays a more casual, subtle and friendly tone, the neuroscience course adopts a professional one!
Create Academy: James Wong’s Indoor Gardening Masterclass

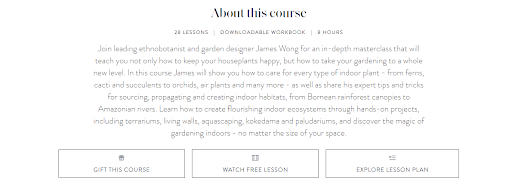
 Source: Create Academy/James Wong
University of Cambridge: Introduction to Cognitive Psychology and Neuropsychology
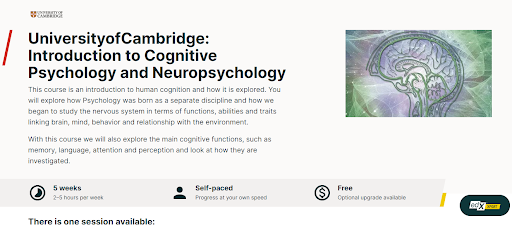
Source: University of Cambridge
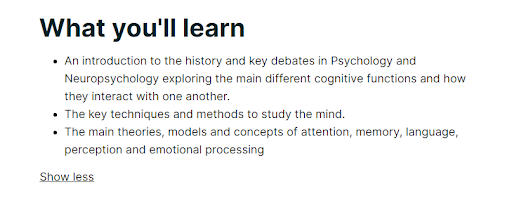
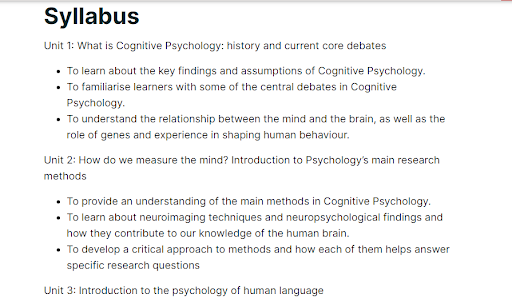
Source: University of Cambridge
Why to Write a Good Course Description?
The answer is quite simple — to sell your course! Yes, it’s that important! A well-written course description can convince a learner to click the purchase button and finally take up the course.
Many course creators dedicate a whole lot of hours to create the perfect course outline and offer unparalleled course material. But they neglect the course description entirely and write it for the sake of uploading the course on the platform.
But that’s not what you should be doing as a creator! Now, let’s understand the benefits of writing a good course description before writing one!
- Connects with Target Audience: A good course description that adapts the right tone and style and is student-centric resonates better with the target audience.
- Clarity and Transparency: It helps the learners clearly understand what the course offers. Further, they can compare their needs and goals with the course objectives and decide whether to enroll or not!
- Build Trust and Credibility: A course that answers the critical questions on purpose, content, and learning approaches is often well-received. Moreover, a good content description builds a sense of trust and authenticity.
- Promote the course’s USP and benefits: A compelling course description highlights the course’s unique features and benefits. This attracts learners and increases prospects of conversion.
- SEO Optimization: A course description with all the relevant keywords and phrases in place ranks higher in the SERP results and gains more visibility. Use keywords related to your niche and ensure they have a high search volume and low difficulty.
- Influences the purchase decision: Ultimately, a well-written course description gives the audience a clear understanding of the course content and the benefits of taking the course. This persuades them to click the “sign-up” or “buy the course” button.
How to Write a Course Description: Key Steps & Best Practices
A course description is like a mini advertisement for your course. Hence, the way you convey the message matters! The message you are conveying here is your course’s USP or key benefits.
This step-by-step guide will help you identify the key elements of a course description and what to include in each one of them. So, let’s get started!
Step 1: Understand Your Target Audience
Before you start writing your course description, understanding your target audience is important. Only if you know your audience’s needs, pain points, and preferences can you craft an excellent sales copy for your course. Empathizing with your audience helps to communicate directly with them!
As mentioned earlier, every course description’s format, style, and tone vary based on the target audience. So, delve into the psychographic and demographic details of your audience. Consider asking the following key questions to write a description to better resonate with the audience:
- Who is the course intended for?
- What is the age – group of the learners? What are their interests?
- Which are the areas they find the most challenging?
- How will the course fill the information gap?
Understanding your target audience helps you fine-tune different sections of your course description!
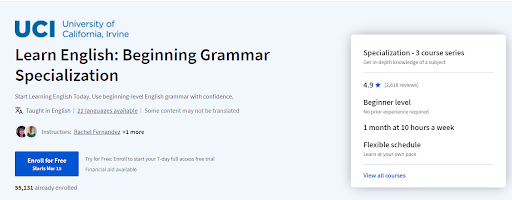
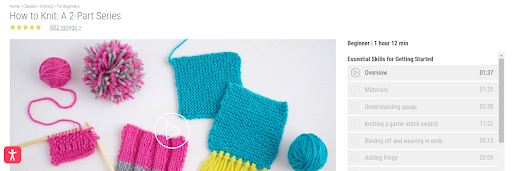
Let’s take a look at two different grammar courses from Coursera. The first is a beginner course covering basic grammar topics, creating a foundation for further specialization. So, here, the target audience is obviously beginners who don’t have any preliminary knowledge of grammar.
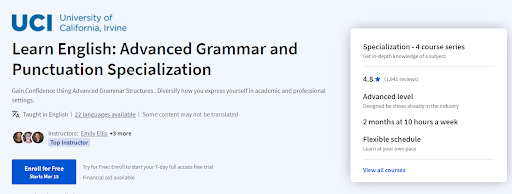
The second course is an advanced grammar course intended for an audience with some basic grammar knowledge.
Learn English: Beginning Grammar Specialization
Course Content

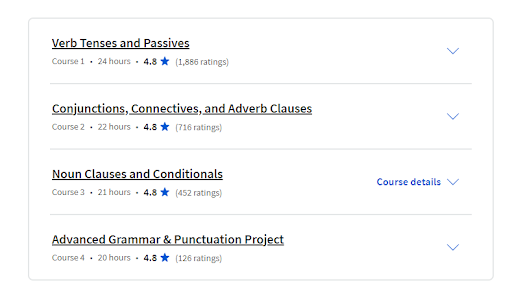
Learn English: Advanced Grammar and Punctuation Specialization
Course Content
Source: Coursera
Step 2: Write a Compelling Course Title
The course title is the first interaction your learners have with your course! It must be short and specific yet convey the relevant details. A clear and catchy course title encourages the audience to read your course content!
So, are you brainstorming for a terrific course title?
Consider your course’s uniqueness and benefits while framing your title. It must aptly align with your course’s content. Add your creative streak with wordplay, puns, alliterations, etc. For example, use phrases like “conquer the cravings” or “speak to sell” to instantly captivate your users.
Here are a few template ideas for crafting a creative course title:
- Learn [skill or topic] in a day – [Quoting examples of Industry Leaders]
- Learn [skill or topic] from scratch to advance
- [Skill or Topic] 101 or 201
- [Skill or Topic] Fundamentals
- The Ultimate or Complete Software/ Hardware Bootcamp for [Topic]
- Build your First [outcome]
- How to [action- outcome]
- [Topic] Accelerator
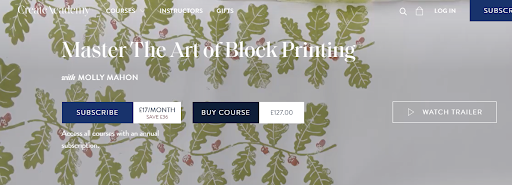
- Master the Art of [Topic or Skill]
Listed below are a few best practices for writing a captivating course title:
- Keep your course title within 65 characters.
- Include target keywords that help you to appear in the Google search results
- Prefer clarity over cleverness; clearly state what your course offers
- Use power words like transform, masterclass, and unique to stir excitement, curiosity and uniqueness
Step 3: Write a Course Introduction
Your course introduction is like a teaser to the actual course content. It is brief, around two to three sentences, capturing the essence of the course. Typically, it includes the benefits, learning methods, and the learner’s expertise level.
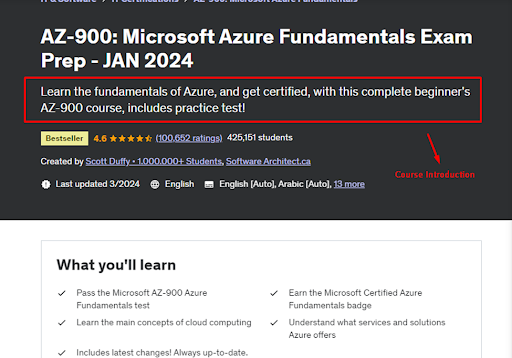
For example, the introduction to the Azure Fundamentals course reads, “Learn the Fundamentals of Azure, and get certified with this complete beginner’s AZ-900 course, including practice test.”
So, here, the creator mentions the course benefits, which are learning the fundamentals and getting certified by the end of the course. Further, the creator also mentions an additional perk—a practice test at the end.
Step 4: Set the Learning Outcomes
Now that you have come up with a catchy course title, a befitting course introduction, it’s time you define the learning outcomes.
So, what do you mean by learning outcome?
Generally, learning outcomes are defined in bullet points and cover the learner’s context and needs. They clearly state learners’ knowledge, behavior, and skill sets after taking the course. So, a learning outcome is the right place to pitch your course!
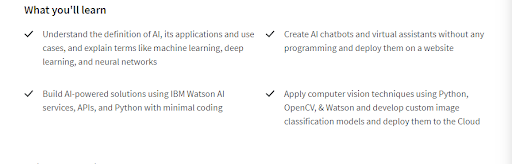
Begin with a stem sentence like “What you’ll learn”, and start each point with a verb that aligns with the objective. An excellent resource for defining learning outcomes is Bloom’s taxonomy. It helps to identify the learning objectives by categorizing them into different thinking levels.
The illustration below explains how a creator can use a verb associated with a particular level to write a learning objective. For example, use verbs like define, list, duplicate, and recall for an outcome related to remembering.
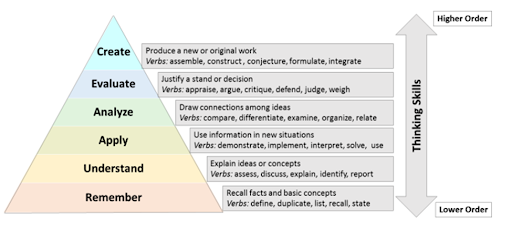
Source: AAMC
Step 5: Specify the Learning Method
Once you define your measurable outcomes, determine the learning approaches to be employed to attain them. Do you want to integrate YouTube videos? Are you trying to enrich your course with a gamification module?
Gone are the days of linear click-and-read courses. Learners are constantly exploring unique methods that offer an immersive learning experience. Choose a learning method by evaluating the best way to deliver a course topic and considering the audience’s learning style.
While some courses focus on one learning style, others use more than one learning style to explain a concept in-depth. Here are the different learning methods to create a stimulating course description:
- Lectures
- Articles, Case Studies
- Projects
- Video-based Training
- eBooks, PDFs
- Audio Turnovers, Podcasts
- Quizzes and interactive activities
- Dialogue Simulation and Branching Scenario
Step 6: Outline the Course Content
The course outline is the ultimate road map showcasing the learners’ journey with the course. They won’t know what the course delivers unless they review the course content!
So, your course outline matters, as it is the crux of your course!
But, how to create a course outline?
List the main topics, modules, and essential concepts included in the course. Start with an introductory chapter, then move on to the basic topics that set a foundation for your learners.
Each module is like a building block of the course, so the related topics should be preferably grouped together. This ensures that the learner can easily grasp the concept in each module.
Consider this course “Kubernetes course for absolute beginners”. The course begins with a basic overview of Kubernetes, moving on to the essential and advanced concepts.
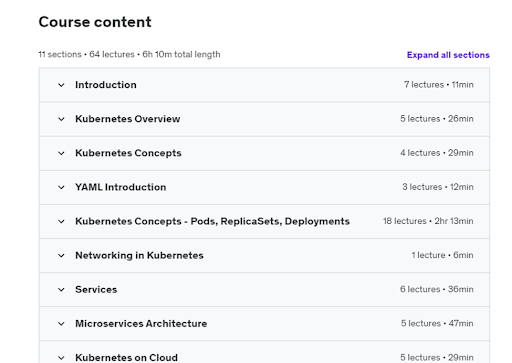
Apart from the course topics, an outline includes a detailed schedule, the duration of each module, and relevant assessments. Break each section into smaller sections and create 10 to 60-minute videos for each. Also, mention the course requirements so learners can prepare well in advance.
Step 7: Mention Who is the Course for
After you have outlined the learning objectives and course content, you should mention who the course is intended for. Mention the expertise level of your prospective learners and who would benefit most from the course.
For example, an introductory Photoshop course is primarily curated for beginners and intermediate learners and experts won’t benefit much from it.

Step 8: Add the Instructor’s Information
Include a detailed instructor bio towards the end of the course. Learners typically look for qualified, best-selling instructors with a significant portfolio of course creation. An ideal bio length is between 50 to 300 words. Keep it intriguing; don’t ramble endlessly about your expertise.
Here are a few pointers to craft a compelling tutor bio:
- A captivating headline
- Instructor ratings, reviews, students
- No. of courses curated
- Qualifications, expertise
- Motivations for creating the courses

Step 9: Include the Course Rating & Reviews
Course ratings and testimonials act as “social proof” to influence your learners to purchase a course. They are a valuable tool for building the credibility of your course and boosting the enrollment rate. If you are a new creator, course ratings are a solid foundation for your course!
Try to get 4 to 10 reviews for your course. Also, remember to acknowledge the reviews and address the learners by their names. While positive reviews help to spread word of mouth, negative reviews are valuable lessons to work on your improvement areas!
Source: The University of Chicago
Step 10: Provide the Course Enrollment Instruction
Course enrollment and registration instructions are one of the nuts and bolts of selling an online course. A vague enrollment process could be a turn-off and instantly affect course sales! Typically, the process involves either a one-time purchase or a subscription package.
Mention the exact course cost and any personal plans or coupons available. Include links and buttons along with clear CTAs to direct users to enroll in your course.
Here’s a well-defined enrollment page for Coursera’s data science course:
Finally, we are done with the steps on how to write a course description! So, now let’s dive into some real examples from popular course platforms!
Best Examples to Write a Course Description
Writing a course description is certainly an art! A one-size-fits-all approach won’t always work; pitch your course description based on your niche and topic.
Let’s take a look at some stunning course descriptions catering to different target audiences!
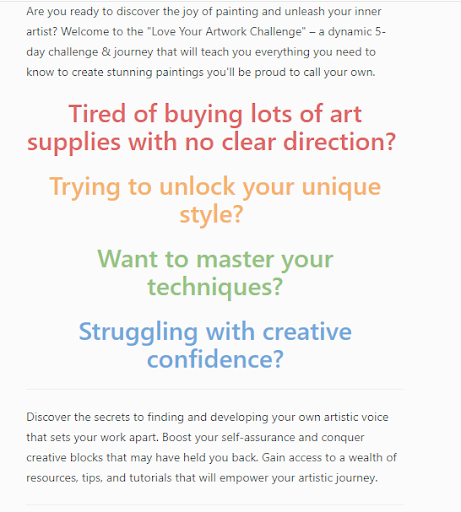
#1 The Aesthetic Description- Diana Bleck’s Love Your Artwork 7-day Challenge
Diana Bleck’s mini doodle course is the perfect example if you are offering a creative course. It blends the course deliverables and visuals well to clearly explain why a learner must enroll in the course.
Course Title: Love Your Artwork Mini Course
Course Introduction: The introduction captures the course’s overview well and creates excellent imagery about its benefits. The most unique element is the course creator’s intriguing questions targeting the audience’s pain points.
Learning Outcomes: Here, Bleck enlists all her dynamic art course deliverables with precise headings. Interestingly, these outcomes cater to all pain points mentioned in the intro section mentioned earlier. This is a fantastic way to persuade your audience and drive conversions!
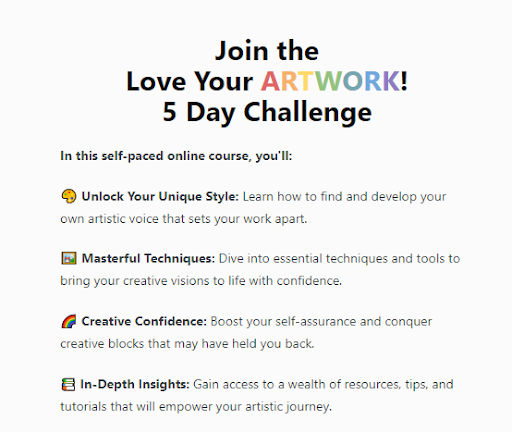
Course Content: Since the course is a 5-day course, the course content section includes a mini course agenda that lists out what it covers each day. For example, the day 1 lesson plan is brainstorming brilliance, where the learner understands how to transition their ideas into creative works.
And the creativity of the course is well-evident with the stunning doodles that captivates the user’s attention.
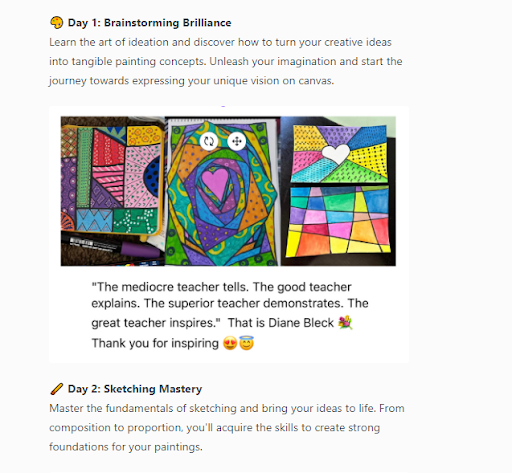
Additionally, the course covers why to join, where Bleck speaks about the course’ USP. At the end, there is a creative snippet with many testimonials from learners who completed the course.
Overall, the writing style is persuasive, with well-placed CTAs to attract users.

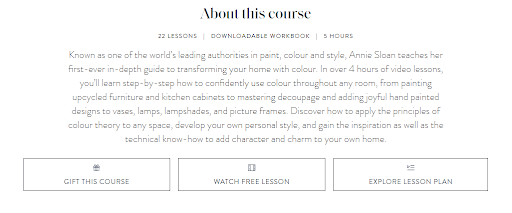
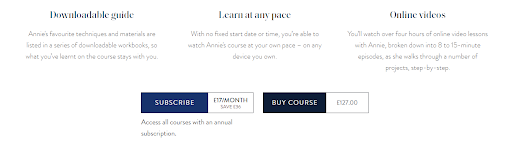
#2 The Perfect Description – Create Academy’s Furniture Painting Masterclass

Annie Sloan’s Furniture Painting Masterclass encompasses all the essential elements to define a course description exemplary.
Course Title: Furniture Painting Masterclass
Course Introduction: From confidently applying color principles to painting your room to adding hand-painted designs to vases, picture frames, and lamps, the introduction captures the pivotal points of the course content. It also mentions the number of lessons and the total course duration.
Learning Methods: Annie Sloan’s course even includes a section that defines the learning methods involved in the course.
Additionally, the course description mentions different enrollment options and their respective prices. Further, it covers the important FAQs that learners might encounter before enrolling in the course.
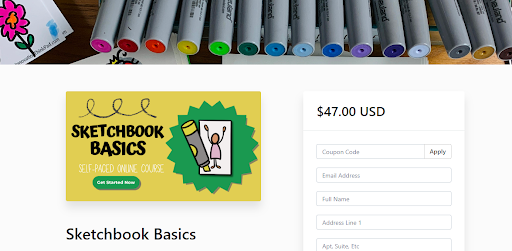
#3 The Benefit-oriented Description – Lahcen Bouya’s Become A Coffee Expert Course
Lahcen Bouya’s Become A Coffee Expert Course description is a perfect example of a benefit-oriented course that clearly defines why a learner should take it.
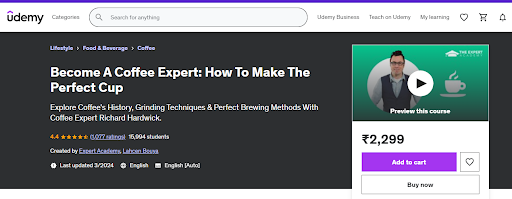
Course Title: Become A Coffee Expert: How to Make The Perfect Cup
Course Introduction: Explore Coffee’s History, Grinding Techniques & Perfect Brewing Methods With Coffee Expert Richard Hardwick
Here, the course creator has captured the essence of the course by briefly enlisting the main sections of the course content.
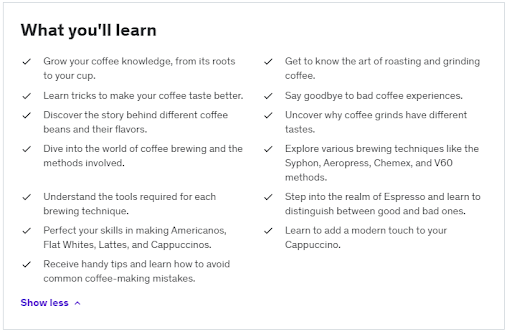
Learning Outcomes: Each learning objective is short and starts with an action verb related to the specific outcome. This easily persuades the learner and gives multiple reasons to take the course.
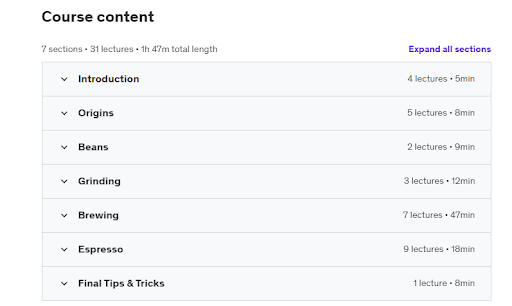
Course Content: A detailed course content that delves into the world of coffee and covers all the aspects of brewing the perfect coffee — from the origins of coffee to brewing the perfect cup of coffee. Further, it also enlists the main sections under each topic and their duration.
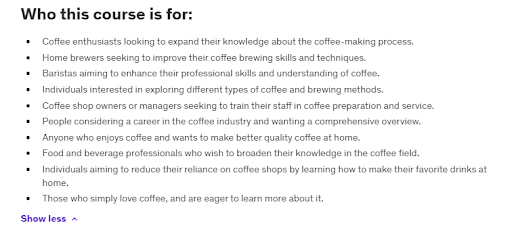
Who is the course for?: Enlist all the entities that would benefit from the course.
#4 The Well-Crafted Description – International Open Academy’s Master Herbalist 101
The master herbalist 101 course includes all the elementary sections to create a well-crafted description copy. Moreover, the course distinctively categorizes each section in separate tabs for clarity.
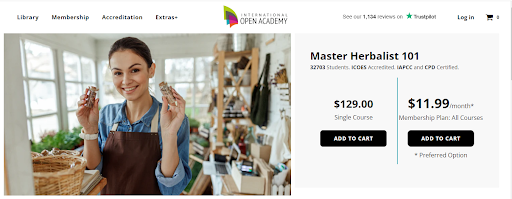
Course Title: Master Herbalist 101
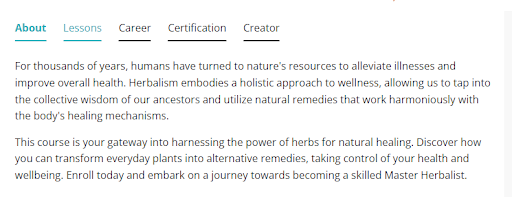
Course Introduction: It starts with a brief narration of the evolution of herbalism and what it means. Then, it states how the course helps you become a skilled master herbalist.
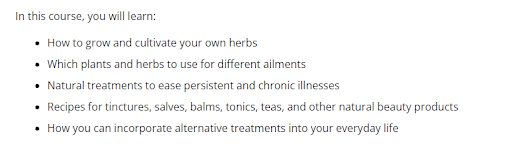
Learning Objectives: This section highlights all the relevant outcomes of the course, making it easier for the audience to make informed decisions.
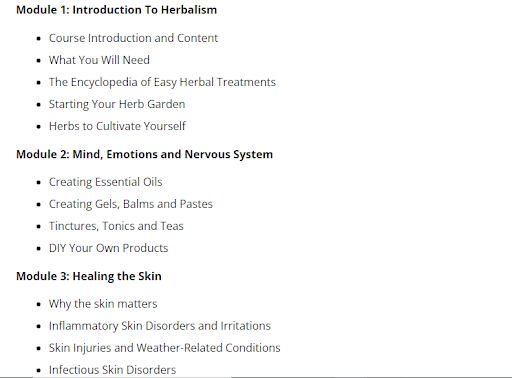
Course Content: The content is well-planned and divided into different modules, starting with the basics (Introduction to Herbalism) and moving to the applications of herbalism (Nervous, healing skin, respiratory system).
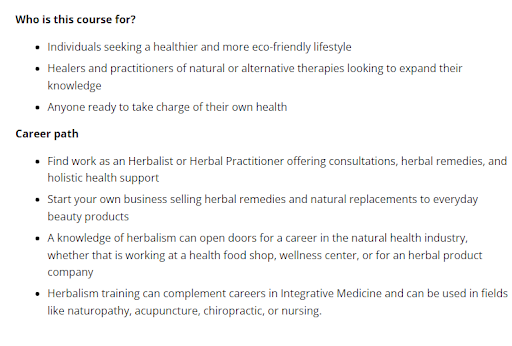
Who is this course for? This includes who the course is intended for and all the possible career paths learners can pursue after completing the course.
Lastly, the course description includes well-defined sections for certification, creator bio, and enrollment options.
Best Practices for Writing Course Description
After analyzing these pitch-perfect examples, we have come up with a few good practices.
Tip 1: Write a catchy and crisp course description
Considering the audience’s brief attention span, people prefer to read precise course descriptions rather than ones that beat around the bush! Outline the course contents and include short descriptions for each module.
Tip 2: Include relevant keywords to gain visibility
Use tools like Google Keywords Planner and Google Trends to find keywords often appearing in user queries. Then, decide which ones to include in your course description. However, avoid keyword-stuffing, as it might negatively affect your SERP rankings.
Tip 3: Emphasize the benefits and unique selling points
Your course description is a mini advertisement of your course. Hence, emphasize the course benefits wherever possible. For example, a good place for USP is the course title and introduction.
Tip 4: Start your learning objectives with an action verb
Keep your learning objectives short and relevant. Preferably start with action verbs that align with learning outcomes, such as gain, learn, demonstrate, or design.
Tip 5: Mention certifications gained on course completion
If your course includes certifications or accreditations, clearly state it in the description. Mention how this course might boost their career: a higher pay bracket, a senior job title, etc.
Tip 6: Include contact information or social media links in the bio
If learners find your course to be a valuable resource, they would definitely try to reach out to prospects. So, include your contact information, website, and social media links in the bio.
Tip 7: Use testimonials, discounts, and coupons to entice your prospects
Persuasive techniques like attractive discounts, coupons, and call-to-actions are a great way to captivate the user’s attention. But don’t go overboard making fake promises.
P.S: For additional information to launch or market your course, make sure you read the following blogs!
- How to Launch an Online Course?(Ultimate Guide)
- How to Market your Online Courses: Proven Tips for Success
Wrapping Up
Nowadays, almost anyone can monetize their knowledge and skills regardless of their niche. Starting a profitable course has evolved as a game-changing trend, given its freedom and flexibility. And if you have already finished with the major portion of course creation, it’s time you craft the perfect course description!
This blog guides you on how to write a course description and helps to write a riveting narrative that converts! While there’s no one-size-fits-all approach, tailor your description to the context, needs, and niche. A good course description attracts the right learners to your course and stays true to what it promises!
If you need help to sell online courses from your website, get in touch with us! You can build an amazing course-selling marketplace using Pinlearn!
FAQs Related to How to Write a Course Description
1. How do you make a course description that sells?
A good course description clearly outlines the course’s purpose and learning outcomes. It divides the course content into digestible sections called modules and lists the course requirements. Additionally, it defines the learning methods and ideal target audience.
2. How can I introduce my course?
Start with a personal hello that sets a friendly tone for your course. Next, explain what your course is about, why to enroll, and who should take it.
3. What does course content include?
Course content outlines the course’s main topics, practice questions, and assessments for testing your knowledge.