How to Record Online Course Videos?
You might have come up with an excellent idea and the best content for your course, but your efforts are in vain if you can’t hook your audience till the end! Well, an interactive video can change your story altogether! Videos have higher recall and retention than pages of boring slides or text; all the learner needs to do is listen!
However, the first question that springs up is, how to record online course videos? And, is it right up my alley?
Well, the thought of recording a course video could be intimidating for some! So, whether you are planning to record your first video or looking to level up your engagement, you are in the right place!
In this blog, you’ll learn:
- Why are videos an effective means of learning?
- A detailed guide on how to record a course video
- What are the best softwares to record course videos?
- Practical tips on how to record a course video for beginners
Why are Videos an Effective Means of Learning?
A picture speaks a thousand words, and a minute of video is about 1.8 million words. Well, this is a modern-day equivalent of Fred R. Bernard’s famous phrase published in Printer’s Ink. This contemporary idea comes from Forrester’s report by Dr. James McQuivey, “How video will take over the world.”
So, now you can comprehend the power video holds to transform online learning! Simply, video is a multi-sensory experience involving audio and visual learning. Perhaps science says we are hardwired to learn more with both auditory and visual information.
Here are the top reasons why video-based learning yields better learning outcomes:
- Engagement: Unlike the written word, there’s much going on while learning from a video: sound, text, body movements, voice modulations and more. Our brain is wired to process visual information 60,000 times faster than plain text. The core aspect of video learning is storytelling, which profoundly affects deep learning and fosters motivation.
- Interactive: Interactive video is a new form of video-making wave in the education industry. An interactive video is 3 times more engaging than a traditional video. Quizzes, hotspots, drag-and-drop, and video-on-video overlays are a few ways to create an interactive video. It offers a more personalized learning experience and makes learning a two-sided process.
- Recall and Retention: Considering the short human attention span, incorporating videos in your course content helps to overcome the forgetting curve. According to Forbes, adding videos to content increases message retention by 95%. This is quite evident as the most memorable ads are visual rather than text-based!
- All-inclusive learning: Traditional learning excludes learners with special needs and adopts a one-size-fits-all approach. Video-based learning is an effective tool that fills the gaps in learning and takes up lessons at their own pace. They can also revisit the videos and use closed captions to comprehend the concepts.
- Microlearning (Bite-sized learning): Microlearning videos divide the information into bite-sized nuggets. This helps to break complex ideas into digestible information and retain the information better. For example, technical training or onboarding guides for employees to join a new organization.
How to Record Online Course Videos: Step-by-Step Guide
Creating a course video could be an overwhelming experience, given the many things to consider.
That’s why we have listed a detailed guide on recording a course video to create an online course:
Step # 1: Identify your Video Objective, Target Audience
You must determine your video objective before outlining a script or getting the right gear to record a picture-perfect video. What value does it add to the overall course-learning experience?
This helps you find the right course topic for your video. Simply put, a video course objective is what the learners take away at the end of the video. It could be knowledge, skill, or a detailed process. Determining the deliverables helps mold a killer script!
Additionally, finding the learning objective of your course and individual modules helps you understand where the video fits in!
Next, identify your target audience and analyze their characteristics, interests and behavior. This helps you create tailor-made content for your audience and understand what your video must focus on and what needs to be skipped!
Step # 2: Choose the Video Type
There are different video formats based on whether your video is standalone content or complements your course material. So, how do you determine which one works best? It depends on your learning goals and the course idea!
For instance, screencasts work best for product tutorials, whiteboards and slideshows for explainer videos, talking head videos are perfect for how-tos, etc. Besides, you could include multiple video types to carve a beautiful narrative! So, the choice is yours!
Step # 3: Create the Storyboard & Basic Script
Now, it’s time you script the actual content! There are two things involved here: storyboard and script. While you might assume storyboards are a thing for movies, you’re wrong; you also need one for your course video! So, what is a storyboard? Is it the same as your video script?
While a script is a written document describing how your video will progress, a storyboard is a visual timeline of your video. Ideally, you should first create a script and then curate the storyboard!
Typically, a video script includes dialogue, action, and all your plans for the video. Needless to say, it is the crux of your video’s mainsail! The script encompasses both the audio and visual plan of action.
Here’s an outline of what a basic video script looks like:
- Introduction: A clear and captivating intro to hook your audience
- Body: Detailed explanation, breakdown of concept into organized module, visual aids or examples
- Conclusion: Summarizing the video, directing to a call-to-action and additional resources
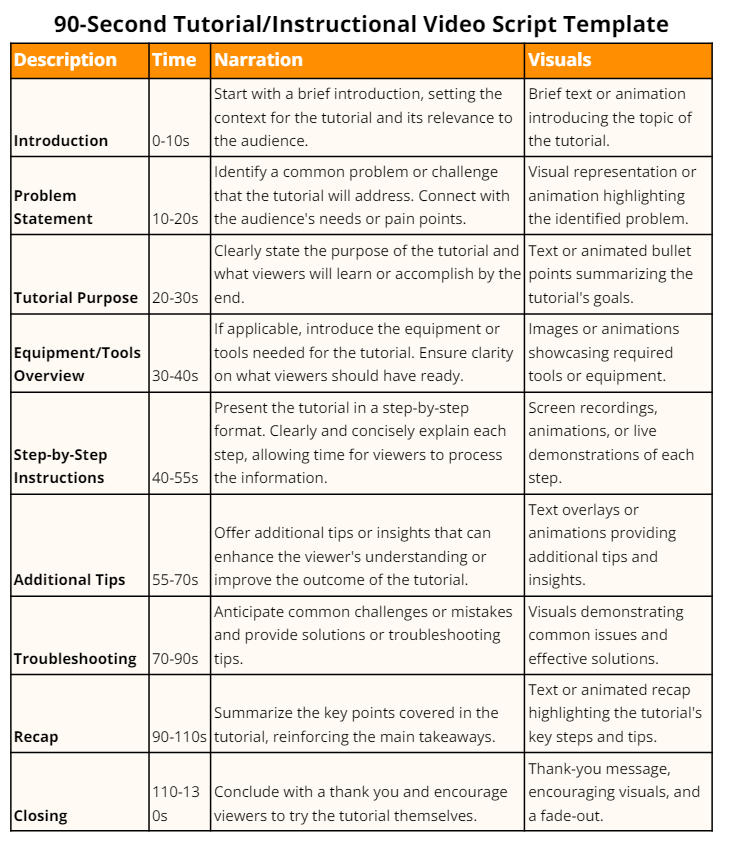
Here’s a well-structured video script template:
Tip: Your video is a multi-sensory experience, so ensure your script complements your video’s audio and visual experience! Preferably, write in a conversational tone and an active voice.
Step # 4: Get Your Tools and Equipment
Once you have crafted a seamless video script, you have a fair idea of your content! Nowadays, videos are a big trend to drive engagement in online learning!
A professional-looking video with the camera, lighting and sound intact works like a charm! But the good news is that you don’t need to be a professional to perfect this trio! You can shoot your video in a quiet, clean place at home or office.
Now, before following a generic checklist for your video equipment, consider your video’s content, format, and goal. For instance, you don’t need to invest in the lighting setup if it’s a screencast video.
Here’s our brief take on all the things needed to craft a visual masterpiece:
Camera and Equipment
If you are just starting out, you don’t need to invest in a DSLR camera right away! Your phone is enough! Nowadays, phones are a kind of all-in-one production device with sophisticated lenses and deep sensors. For example, the 2015 Tangerine movie was shot entirely on the iPhone.
Use the right camera settings and video mode – 30FPS, 60FPS(for whiteboards), at least 1080p if 4K is not possible.
In case you are recording from the computer, Logitech HD Pro C920,JLab JBuds USB Webcam, Microsoft LiveCam Studio are a few affordable webcam options. On the other hand, for cameras, Canon 70D with 35 mm lens is recommended for a professional setup.
Invest in a tripod to avoid shaky footage, regardless of the camera you opt for.
Tip: You can use the Reflector app to mirror your phone to your PC, record voice overs, embed frames, etc.
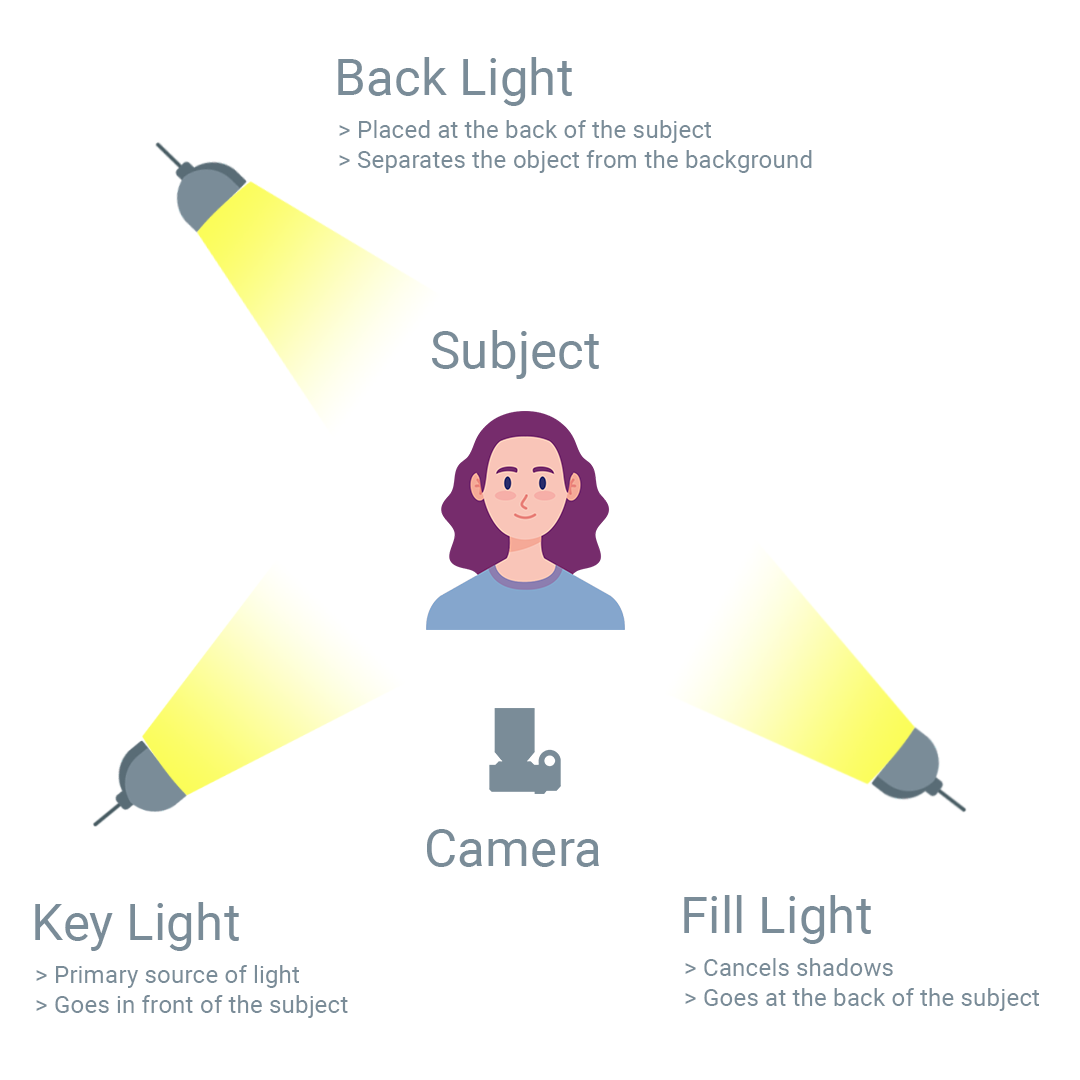
Lighting
Good lighting is one of the critical elements of filming course videos. And natural light is the light of the lights! However, you don’t have much control over natural light. Moreover, you must shoot, preferably at the same time of the day. So, if you are a newbie, invest in artificial lights like ring lights and softboxes.
Ring lights are ideal for creating high-quality, well-lit videos without the irking shadows. Softboxes are tent-shaped structures that provide more directional lighting and also reduce shadows.
Audio
Good audio matters as much as high-quality videos! Imagine the number of times you have watched an entire video because you absolutely love its audio quality. However, webcams are versatile tools that can capture audio and video data. Invest in a good microphone to capture your voice’s slight nuances and modulations!
Here’s a handy list of some pocket-friendly microphones, saving you from hours of scouring over the internet:
- Dynamic: Simple-in-construction yet economical. E.g., Zoom DZM-1, Shure SM7B
- Condenser: Optimum for capturing superior sound quality minus self-noise. E.g., Blue Yeti USB microphone, Blue Snowball
- Lavalier: Portable and lightweight, it fits right into your lapel. E.g., Rode SmartLav+ , Audio-Technica ATR3350iS
So, why wait, go ahead and gather your gear!
Step # 5: Set up Your Space
You have everything you need to record your first-course video; it’s time to set it right for a high-quality professional video. An ideal video setup matters more for talking head videos, as it conveys a lot about your personality, interests and professionalism!
First and foremost, identify your video type. Are you filming a talking head, full-body, or top-down video? While talking head videos are common on YouTube, you need the other two categories to demonstrate a skill, a workout, etc.
Each video type demands a different video setup. For example, for a full-body setup, your camera needs to be positioned far away from you to capture the entire frame.
Here’s a complete checklist for setting up your recording environment:
- Find the best angle for your camera
- Optimize the lighting
- Visualize the background
- Personalize the background with things related to the course
- Neutralize the ambient or background noise
- Organize your desktop and close unwanted windows
Step # 6: Lights, Camera, Record the Video!
You have got the script and props; it’s time for some action! So, get started and hit the records on and off camera!
If you’re facing the camera for the first time, it’s entirely normal to feel the adrenaline rush! Calm down; take a deep breath and resume where you left off! Remember, you can always edit your mistakes! All you need to do is take that first monumental step!
A good way to build up confidence and get over your mistakes is to — practice, practice, and practice! Don’t forget to test your camera and microphones before you set your cameras rolling.
Depending on whether you are recording your webcam, screen, or both, choose the right tool! We have mentioned the best recording software to get started later.
To get started, do take a look at this detailed video on recording with Loom!
Now, here’s a bonus section from our side:
Srivathsan GK, CEO of Pinlearn, recommends,
“Leverage platforms like Geogebra and Hyperbeam for creating and recording academic courses. GeoGebra is a platform that offers free digital apps and more than 1 million resources for subjects like math, physics, and computer science that integrates well with Geogebra and Google classrooms. On the other hand, Hyperbeam helps tutors to open multiple third-party websites and sync the audio and video seamlessly to explain a specific concept.”
Step # 7: Fine-Tune with Essential Edits
You can’t ace a perfect shot in one take! But, don’t fret a good editing software is a savior and can get rid of your mistakes. Be it trimming the content, adding transitions, manipulating sequences, a polished video is just a click away!
Let’s look at some of our top software picks!
- Adobe Premiere Pro: The versatile tool makes an excellent choice for content editing. Its free version offers basic editing, a free soundtrack library, and unlimited exports. The paid one offers premium features like 4K exporting, reframing, advanced sharing, and more.
- iMovie: It is an easy-to-use, comprehensive editing software that comes free with Mac. iMovie allows up to two video tracks and can be used on iPad and iPhone to create on the go!
- Final Cut Pro: Another Apple exclusive, Final Cut Pro is a premium tool for content creators. 360-degree video editing, 4K resolution, and advanced editing are some of its features.
Here are some good audio tools for voice overs:
- Audacity: It is a free audio editing tool with a complete set of editing and multi-track mixing tools. A standout feature is that it is open-source yet powerful enough with premium features.
- Logic Pro: This one is a Mac-exclusive audio editor. It has advanced auditing, recording, and high-quality effects that allow powerful recordings to be created.
- Adobe Audition: A powerhouse of audio editing, Adobe Audition is feature-rich software that offers single—and multi-track audio editing. The software is compatible with MacOS and Windows. The only caveat is that it’s expensive.
Step # 8: Upload the Video on the Course Platform
Finally, you have recorded and edited your first video. So, congratulations, it is indeed a big feat! Next, you need to upload your video to your course platform. If you have planned to record multiple videos, one for each lesson, first finish recording them first and then upload them all together.
Ideally, your video size should be around 1GB for faster uploading; try compressing your video. The standard format for uploading course videos is MP4.
What are the Best Softwares to Record Online Courses?
If you are still overwhelmed by cameras, stick to screencasts! Are you creating walkthroughs, demos or product tutorials? Screencast videos ideally convey the information better.
You don’t need any fancy equipment here, but you might need a microphone and good screencast software.
Here are the top screencast softwares that are great to show how things work:
- Loom (Windows, Mac, iPhone, Chrome)
With a straightforward interface, Loom is the go-to screen recording software for quickly recording and sharing videos. You can record your screen, webcam or both and edit it effortlessly. Its free plan allows 25 videos of up to 5 minutes, while the premium plan offers unlimited videos.
- Cams Studio (Windows)
Another free screen recording software that does its job well is CamStudio. Its video annotation feature automatically adds screen captions. The software is available for free on Windows.
- Canva (Windows, Mac)
Canva is not just an online template editor; it also makes excellent screen software for recording presentations. Its visually stunning templates, seamless voiceover integration and talking head embed feature treat the audience to an audiovisual treat!
- Screencastify (Windows, Chrome)
Beyond screen recording, Screencastify helps to edit, add interactive quizzes, and create video assessments. Its free plan allows you to create the first 10 videos of up to 30 minutes.
- Camtasia (Mac, Windows)
If you are looking for advanced screen recording software, Camtasia is your premium bet! From editing, transitions effects, and capturing cursor effects, it is your sophisticated screen recording and video editing software. The only caveat is that it’s highly-priced at about $299/per user.
Tips on How to Record a Video Course for Beginners
- Keep your videos crisp and concise, covering topics to the point.
- Analyze the video type that works best for your content.
- Stop aiming for absolute perfection; focus on sharing the knowledge effectively.
- Avoid timestamping your video with greetings.
- Make sure your videos are less wordy and incorporate more practical examples
- Adorn a pleasant smile to connect with your audience well while recording your videos.
- Imagine you’re striking up a conversation with your friend.
- Break down your topic to enhance the overall learning experience.
If you want to get in the online course selling business check out our detailed blogs on the same:
- How to create a course outline
- How to price an online course
- How to sell online courses from your website
- How to launch an online course
Conclusion
Now, you know all the nuts and bolts to create an engaging course video! Creating a video for the first time might be a challenging experience for course creators. But it’s not about getting the right shot but more about effective communication! Identify your video objective, choose a befitting video format and, of course, a stellar script.
Don’t follow what others are doing; try something unique! While creating an engaging video is crucial, choosing an excellent platform to host your videos is paramount. If you are planning to create a course-selling marketplace, then Pinlearn is an excellent choice for creating, selling, and managing your courses! It is a readymade script that helps you from course conception to detailed analytics!
To know more take a look at the Pinlearn demo.
FAQs-Related to How to Record Online Course Videos
1. How to record video for an online course?
To create professional-looking videos, use high-quality video, superior audio quality, powerful video editing software and the right kind of lighting.
2. What are the softwares to record online course videos?
DemoAir screen recorder, Loom, Screencastify, and Bandicam are a few softwares for recording course videos.
3. How do you create course videos?
To create a captivating course video, plan your video well ahead, create a good video script, set up your recording space, record the videos and edit them to perfection!